Thank you for purchasing a Downtube bicycle! We hope you will years of enjoyable use from your new bicycle. Please read the entire manual before operating the bicycle.
Your Downtube bicycle is 100% assembled at the factory. You should take this bicycle to a bike shop to get it checked and tuned by a bicycle professional. The shop will be able to find problems that may make your bike unsafe. Please give the below check list to your mechanic and make sure they go through everything.
- Remove the bell from the bag, using a screwdriver attach it to the bike. The bell lever should be located near the left thumb.
- Adjust both the front and rear reflectors with a screwdriver.
- Check to make sure all quick releases are tight, especially the one on the frame and stem. Check them weekly and tighten as necessary.
- Check the stem and make sure it is attached properly. If it is loose it may cause the rider to lose control.
- Check the headset to make sure it is not too tight (or loose).
- Check brakes and make sure they are toed in to eliminate noise while braking
- Check shifting & view rear derailleur adjustment instructions
- Make sure the brake, dérailleur, and stem bolts are tight, but not over tight.
- Tighten (do not over tighten) crank bolts and pedals.
- The brakes and shifter should be oriented in a comfortable manner for the rider. Make sure your wrist is not bent when engaging the brakes. Your arm should be straight from your shoulder to your knuckles. Otherwise you will develop wrist pain.
- The bar ends should be oriented upward for riders that intend on cruising slowly, they should point down for riders that want to get into an aerodynamic tuck position. The bar ends will allow the rider to pull back on the handlebar when climbing a hill. This will force the rear wheel into the ground and make you go faster with less pedalling effort. They can also give the rider numerous hand positions.
- The saddle should have and angle between 0 and -5 ( pointing down ) degrees. A lower angle is more comfortable to sit on. However when the angle is too small the rider will slide down while riding, causing discomfort. It is best to start with a saddle at 0 degrees (parallel to the ground) and go down until the rider feels comfortable sitting with a maximum downward angle of -5 degrees. Do not forget the back of the saddle will compress under rider weight, hence this must be taken into account when adjusting.
- The proper seatpost height is very important. Most novice cyclists ride with a seatpost that is too low. This will cause the rider to work very hard even at slow speeds, additionally it may cause knee pain. It is also unsafe for the saddle to be too high. A high saddle may allow the riders knee to lock out in a straight position while pedalling. This may cause serious knee damage, hence NEVER allow your knee to be completely straight when pedalling. Ideally a rider should have a slight knee bend while the foot is at its furthest point from his/her hip. A 35 degree angle at the bone (not the visual angle you see…. use a tool to measure) at the furthest point is optimal.
- Check the bearings at the hubs, and bottom bracket, lube if necessary.
- Inspect the frame, especially the swing arm on the full suspension bike. Make sure all bolts on the full suspension swingarm are tight.
- Fill the tires with 60psi of air.
General maintenance:
1. Lubing the Chain with White Lightning is highly recommended. Please note the chain must be completely clean before applying White Lightning.
2. Check the frame quick release for play every ride. Tighten the quick release as necessary.
3. Check the headset and stem to make sure it is not loose weekly.
4. Check the brake shoes for wear weekly, replace as necessary. We recommend Kool Stop pads as replacements.
5. Front & rear hub, headset, and bottom bracket bearings should be repacked with grease once a year
Be careful when braking under wet, rainy, muddy, snowy or icy conditions. Wet rims require more distance to stop. Never lubricate the side wall of the rims or brake shoes this will make the brake ineffective.
Safety
- Folding bikes ride lower to the ground than normal bikes. Do not turn sharply or hold the bike at an angle while riding. This may cause the pedals to hit the ground and the rider may loose control and crash.
- Always wear a helmet while riding your bicycle. We recommend helmets with many air vents, and a custom fit dial to keep you cool and comfortable while riding.
- Obey all traffic laws and signs
- Be alert to avoid accidents
- Inspect your Downtube bicycle daily. Check your quick releases, brakes, and tire pressure before every ride.
- Avoid hazardous road conditions and unsafe roads/paths.
- Ride with extra lighting at night or in low visibility conditions.
- Do not carry passengers on your bicycle.
- Keep body and clothing away from the chain ring and other moving parts on the bike.
- Wear shoes that fit, will stay on your feet and properly grip the pedals. Never ride with unprotected or poorly protected feet. Do not ride wearing sandals or other open footwear.
- Wear bright, visible clothing that does not restrict movement but is not so loose that can be caught by the moving parts of the bike or objects as you ride past them.
- Do not jump or attempt stunts on the Bicycle.
- Travel at or below the speed where you can comfortably react to any problem that could occur during your ride. Allow for ample time to brake slowly and safely to avoid obstacles.
RIDING ON THE ROAD
- Before you move off from the side of the road, think which way you intend to go and look both ahead and behind for moving traffic. If there is traffic approaching, wait until it has passed.
- Except in an emergency, stopping must be done carefully and gradually. Think of where you wish to stop and look particularly to the rear over your right shoulder for following traffic. Signal that you are going to slow down and stop. But when braking keep both hands on the handlebar. On wet road, it will take you much longer distance to stop. So allow at least twice the distance than normal.
- Do not signal when you are braking in an emergency. Keep both hands on the handlebars to maintain control and use both brakes.
- Always keep both hands on the handlebar unless you are signalling.
- You must keep at least one hand on handlebar at all time.
- Always keep both feet on the pedals.
- Always use a bicycle way or cycle lane.
- You must never to towed or hold on to a vehicle or tow another cyclist or other vehicle.
- You must not carry a passenger.
- You must not carry anything which might affect your complete control of your bicycle or your balance, or can be caught into the wheels or chain.
- You must not carry anything that blocks, or may block, your view of the road.
- Do not wear earphones of any audio devices.
- Do not lead an animal.
TIRES AND WHEELS ADJUSTMENT
Check tire pressure weekly. Adjust if necessary with a standard schrader pump between 40-60psi.
Spin each wheel slowly and look for cuts in the tread and sidewall. Replace damaged tires before riding. Spin each wheel and check for the brake clearance and side-to-side wobble. If a wheel wobbles or hits the brake pads, take it to a qualified bike shop to have the wheel trued.
HANDLEBAR AND STEM ADJUSTMENT
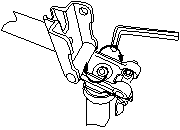
Use Allen wrench to change the angle of the handlebar by loosening its binder bolt, rotating the bar or extension to the desired angle, re-entering it and re tightening the binder bolt enough so that the bars or extension can’t move in relation to each other and the stem.
If the stem is not properly aligned with the front wheel, it will need to be adjusted. Loosen the stem bolt just above the headtube. Place the front wheel between your legs and twist the handlebar/stem assembly to align the handlebars in relation to the stem. Then re tighten the stem bolt.
 Warning: Failing to properly tighten the stem binder bolt or the handlebar binder bolt, you may compromise steering action, which could cause you to lose control and fall.
WARNING: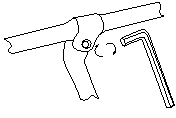
![]() WARNING: Do not over tighten the stem bolt or other clamping devices; there is a danger of damaging the stem and the fork and risk of injury to the rider.
WARNING: Do not over tighten the stem bolt or other clamping devices; there is a danger of damaging the stem and the fork and risk of injury to the rider.
SADDLE ADJUSTMENT
Want help picking a comfortable saddle? email yanL@downtube.com with your specific needs and he will give a recommendation. Correct saddle adjustment is an important factor in getting the best performance and comfort from your bicycle.
Your leg length determines the correct saddle height.
To adjust the saddle height, loosen the seat post quick release and move the seat post up or down as required. Re tighten the seat post by locking the seat post with quick release. Make sure that it is tightened enough and you cannot twist the saddle easily out of alignment. ![]() WARNING: The seat post must NOT project from the frame beyond its minimum insertion or maximum extension marks.
WARNING: The seat post must NOT project from the frame beyond its minimum insertion or maximum extension marks.
- Saddle front/back adjustment
To find the most comfortable position, please adjust the saddle forward/backward position![]()
![]() WARNING: After any saddle adjustment, be sure to tighten the saddle adjusting mechanism properly before riding.
WARNING: After any saddle adjustment, be sure to tighten the saddle adjusting mechanism properly before riding.
WARNING: Folding bikes ride lower to the ground than normal bikes. Do not turn sharply or hold the bike at an angle while riding. This may cause the pedals to hit the ground and the rider may loose control and crash.
FOLDABLE PEDAL
Both pedals are foldable. Push the pedal inward to the crank. Then fold it downward. To unfold, simply lift it up perpendicular to the crank. 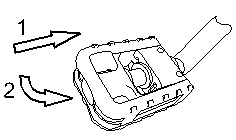
Push inward
2. Fold downward
REFLECTORS
Reflectors are important safety devices that are designed as an integral part of your bicycle. Do not remove them on any circumstance. Keep clean and replace them immediately if found damage.
BRAKE AND CABLE ADJUSTMENT
Please view our detailed brake adjustment instructions on adjusting brakes
Brakes on your bike are adjusted when you purchase the bike. They allow you to adequately slow down and stop the bike when the brake lever is squeezed. Periodically checking and adjusting the brakes is strongly recommended. Braking cables can be tightened/loosed by rotating the barrel adjuster nut on the brake levers (clockwise/counter clockwise). The V-brakes on this bike have quick release mechanism and allow the brake shoes to clear the tire when a wheel is removed or reinstalled. When the brake quick release is in the open position, the brake will not operate. Make sure you understand the way the brake quick release works on your bike. Consult local bike shop or bicycle technician for detail whenever is needed. 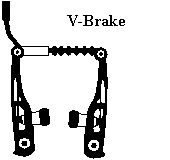
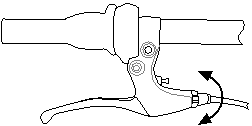
Barrel Adjuster
WARNING: The shorter the brake lever reaches, the more critical it is to have correctly adjusted brakes, so that full braking power can be applied within available brake lever travel. Brake lever travel insufficient to apply full braking power can result in loss of control.
Check that the brake quick release is close and the straddle cable is securely engaged. Squeeze the brake levers. Confirm that the brake shoes are contacting the wheel rim within an inch of brake lever movement. You must be able to apply full braking force at the levers without having them touch the handlebar grips. Otherwise, your brakes need adjustment. Do not ride until the brakes are properly adjusted.
Shifter Adjustment
New bikes normally need a minor cable adjustment. This can be done while riding, by rotating the barrel adjuster on the shifter.
FOLDING INSTRUCTION
In order to allow the folding bike to stand upon the ground properly after folding, perform the following steps:
STEP 1: Loosen the seat post quick release and push the saddle with seat post down to the bottom. Then slightly tighten the quick release again.
STEP 2: unlock the quick release of the handlebar stem and fold the handle bar stem downward to the right hand side of the bike.
STEP 3: Set the kickstand to the ready for riding position (kick it up horizontally).
STEP 4: unlock the quick release of the frame and fold the front part of the frame to left.
STEP 5: fold the right and left pedals.
The steps are completed.
Warranty
The warranty for your bike varies depending on your purchase location. Most bikes sold via our website www.downtube.com or specialty bicycle retailers have a limited one year warranty. However closeout bikes may have a limited warranty as short as 1 day. Downtube will repair and/or replace any parts within the warranty period that are defective. The Downtube takes no responsibility for abuse, misuse, or lack of maintenance. If you have a part that is defective, please send an email to yanL@downtube.com. We will issue an RMA # within 24 hours. After the part is received it will be inspected. We will ship out replacements for all defects in a timely manner. However, the parts will be returned to the shipper, if the part has been abused or misused.
